Wednesday, August 18, 2010

Terrain: Once You Pop...

I've mentioned several times here that I'm a big fan of the resin terrain produced by Armorcast, but I'm a big fan of scratch-building as well - but many times it just doesn't give me the results I'm looking for. (A lot of times it doesn't matter how much Green Stuff and bitz you glue to a yogurt container, it still just looks like a yogurt container). But, a lot of gamers find resin terrain prohibitively expensive. Armorcast has a unique solution that attempts to give us the best of both worlds - inexpensive kits that allow you to turn empty cans into terrain pieces.

I've been wanting to try some of these for a while, and I got to select a freebie when I bought a mess of Armorcast stuff from their booth at GenCon. I have several other small "industrial" terrain pieces that could represent a refinery or chem plant, so I chose the Potato Crisp Can Liquid Storage Unit. This kit consists of four pieces of molded resin designed to be glued to a Pringles can, and sells for $10.

This project required the assistance of my lovely wife - because I don't really care for Pringles all that much, but she loves 'em. At my request, she picked up a can during her next trip to the grocery store. After she had packed them in her lunches for a week, I snagged the empty can:


One thing that I was concerned about was the strength of the can - although it has a metal bottom, it's just flimsy cardboard. I considered several options for reinforcing it, such as filling it with plaster or folded newspapers, but that would increase the weight significantly, and one of the much-touted advantages of resin is that it's extremely lightweight - it seemed silly to negate that. I decided to strike a compromise between strength and weight and fill the container with expanding foam insulation:


This will hopefully give the empty can a "honeycomb" -like web of support, without adding too much weight. You should be able to find cans of spray insulation at any home improvement or big box store for about three dollars. It comes in useful for other types of terrain projects as well, so it's handy to have a can around. For this project I used the "minimum expanding" variety, since I want the foam to be as dense as possible.

Following the instructions on the label, I filled the Pringles can with the insulation:


The foam needs to dry for a couple of hours, so I went and took care of some other stuff. One of those things was to prep the resin pieces:


Most resin pieces are cast in molds that have been treated with mold release - this needs to be removed before gluing or painting. I keep an old toothbrush with my painting supplies, and scrubbed the pieces well with lukewarm water (do NOT use hot water - it will warp the resin) and dish soap, then rinsed them and left them to air dry.

After the foam insulation has dried for a couple of hours, I had something that looked like this:


(Now you see why I used the "Minimum Expanding" variety, huh?) I cut the insulation off flush with the top of the can with a hacksaw blade:


(I didn't throw out the "bubble" of foam I cut off - I can use it for another project!)

Hmmm, an unexpected setback: I need the insulation that's flush with the rim of the can to be solid & flat - what I was left with was a solid outer rim, and a core of uncured goop:


Okay, change of plans. I dug the lid for the can out of the trash, and cut a small hole in it. I then placed the lid back on the can and topped off the insulation:


This gave me flat surface I wanted, and I would only have to trim the small "plug" of insulation at the center of the lid. Every so often I would remove the lid to let the surface of the foam insulation cure a bit, and once I noticed it expanding past the rim, I would put the lid back on and squash it down again. This worked well, since the foam won't stick to the plastic of the lid. I would also tear the "plug" of insulation off several times, to let as much of the foam on the interior of the can cure as possible.

Next I glued the vertical accents to the can, using cyanoacrylate glue & an accelerator spray:


It was kind of handy having the labels on the can - it gave me a straight line to make sure I had the accent pieces lined up straight.

I gave the metal bottom of the can a quick sanding to give some "tooth" for the adhesive:


Since the piece will probably be picked up & handled a lot by the top and bottom, I wanted a stronger bond for those pieces - I chose to use an epoxy resin:


(I just mix the resin in the blister pack it's packaged in - then you can just throw it away). I applied the resin to the top of the can and to the base with a small wooden craft stick:


Then I assembled the whole deal:


I took the whole thing outside to dry - epoxy stinks while it's curing. (One of my roommates in college walked in to the room when I was using some epoxy and asked me, "What smells like a combination of feet & @$$ in here?!?")

After everything was dry, I gave the whole piece a coat of black primer:


(Unfortunately I was trying to squeeze the last little bit out of a can of black primer, and was laying it on pretty thick to cover the neon orange-colored can, so I got a few runs in the primer coat). Luckily that's not a big deal on a large terrain piece - I hit it with a bit of sandpaper to minimize it.

Next I gave it a coat of heavily thinned Citadel Boltgun Metal, and a liberal coat of my homebrew APJ Heavy Black wash:


Then the whole piece received a thin wash of Citadel Devlan Mud wash, to make it nice and grimy:


I gave the base a coat of PVA glue, then sprinkled it with sand:


I drybrushed some of the details with Citadel Mithril Silver. I then painted the beacon lights with Citadel Goblin Green and Warlock Purple, then highlighted them with Scorpion Green and a 50/50 mix of Warlock Purple & Skull White. The wires & hoses were painted with Citadel Blood Red & Vallejo Ultramarine Blue:


I decided I wanted to have a rust effect on this piece - it would be most prominent at the top, since that's what would take the brunt of exposure from the elements, and fade as it went down towards the bottom, as though rain had been slowly spreading the rust. Instead of applying this with a brush, I went with a sponge for a more "organic" look. For the sponge, I plucked a few pieces of foam out of one of my Army Transport trays:


...then I tore one chunk of the foam diagonally:


To apply this effect, I dipped the sponge in the paint (directly from the pot), then daubed most of it off on a paper towel. Then I blotted it around the top of the tank. For the first color, I used Citadel Snakebite Leather:


Then I used the flat side of the sponge to "drag" the paint down the tank vertically:


For the next color, I used Citadel Blazing Orange. Again, I dipped the sponge in the paint:


Then blotted most of it off on a paper towel:


Then I daubed it over top of the Snakebite Leather (I used the orange much more sparingly):


Then drug it down with the flat side of the sponge:


There were a few areas where I didn't work fast enough, and the Blazing Orange dried before I could drag it out with the sponge. The nice thing about this method is that you can go back and daub over the orange with the original color if the effect is too glaring.

After the PVA glue had dried, I dripped some Woodland Scenics scenic cement on it, just to make doubly sure it won't wear off:


After that had dried, I drybrushed the sand with Citadel Bestial Brown:


There were a few areas where the orange color was still a bit too bright for my tastes, so I went over it with a thin coat Devlan Mud wash:


...and here's the finished piece, ready to be clearcoated:


So there you have it - a large piece of terrain that looks great on the table, with nicely detailed resin accents, for $10. Hard to beat that.

Tuesday, August 17, 2010

Tutorial: Casting Resin Bases

A couple of weeks ago Drathmere posted some photos when he was casting his own resin bases for his Death Korps of Krieg army. I've been toying with the idea of trying this myself for some time, so I decided to take the plunge, and to go ahead and try to write a thorough tutorial while I do it.

The first set of bases I wanted to get out of the way were for my Ork army. I decided I wanted to go with an "urban wasteland" style, with lots of cracked concrete, debris, and rubble. The first step was to gather my materials:


...some bases with the slots filled with Green Stuff, my various basing materials, and a bag o' bitz that I bought at a convention a couple of years ago.

The bitz are just a bunch of odds n' ends - mostly marine parts and weapons. I dumped them out and started digging through them:


These are the pieces I settled on:


(Bonus: I found enough bike parts to finish a few Space Marine bikers I inherited from a friend! W00t!)


For the basic structure of the bases, I used a container of "concrete rubble" from Gale Force Nine.


To be honest, I generally don't use much Gale Force Nine stuff (I find it to be WAY overpriced), but I picked this up a couple of years ago at a convention and forgot about it until digging through some boxes in the closet last week. I have a friend who makes this himself by filling an old cookie sheet with plaster of paris, waiting for it to dry, and dropping the whole thing on the patio - that'll give you enough to last a dozen gamers a lifetime, for about 1/3 of the price of the tiny container pictured above.

Basically, I just started picking out pieces that roughly lined up, and started gluing them down with superglue. You don't want them to extend too far beyond the edge of the base, or you'll have problems with your mold later. After that, I glued down the debris where I felt it needed something:


To close up some of the larger gaps (when we make the mold, we don't want the rubber to be able to flow inside the base), I filled them with gel superglue and dunked the bases in my bag of sand:


After the glue had dried, I dripped some scenic cement from Woodland Scenics on the sand to "lock it down" permanently:


(I really like the scenic cement from Woodland Scenics - a lot of people claim that a homemade PVA/water mix does the exact same thing, but I swear that the scenic cement seems to "wick" exactly where you want it).

After everything had dried, I started inspecting the bases for areas that I thought would give me problems during casting. Here's one - there's a gap underneath this crest that was broken off from a standard bearer's pole:


To fix this, I mixed up a 50/50 mix of sand & PVA:


...then I used it like spackle, filling in the gaps:


With a little bit of paint, it will look like the crest is laying in some mud.

I have also been working on test models for my Death Korps of Krieg army and was pretty pumped about that, so I decided to make up some bases for them as well. I started by cutting up some wooden craft sticks and gluing them down to some spare bases - since I plan to theme the Krieg army to work with the Trench Outpost Box I just got from Armorcast, these will simulate the duckboards found in the bottom of WWI-type trenches:


After that, I added some sparse sand & rocks:


...then I clipped some tiny pieces of brass wire, to simulate shell casings:


These bases also got the Scenic Cement treatment:


After everything was dry, both sets of bases got a coat of black primer:


Get to the casting, already!

Okay, okay. For the casting, I purchased the Super Casting Kit from Alumilite:


The MSRP of this kit is $69.99. Now, if you start reading the DIY blogs & web forums, you'll find a lot of people saying that you can order the individual supplies in quantity, and it'll be much cheaper - and they're right. However, I recommend getting the kit the first time out for several reasons:


-It's complete. I know there have been several times that I've tried to start a project I've never tried before, only to realize I don't have something I need, and I have to run to the store, or worse, have to order something online and wait a week for it to arrive before I can start. It's INCREDIBLY frustrating. You know you'll have everything you need if you get the kit.

-You know everything is compatible. If you try to buy a lot of these chemicals online, they are sold through industrial supply houses that do not have consumer-friendly web sites - often the description is just a cryptic product code. We are working with some potentially nasty chemicals here, and the last thing you want is to blow up your house of get overcome by toxic fumes because you bought the wrong item.

-It has clear, concise instructions. The kit is really geared towards the rank amateur, and, in addition to the basic tiny pamphlet, it contains a full-sized booklet with six or seven pages of tips for getting the best results possible.

-It's readily available. This kit is available at many larger craft stores & hobby shops (I got mine at Hobby Lobby; it may also be available at stores like Michael's and HobbyTown. And, as all dedicated cheapskate hobbyists know, if you subscribe to Hobby Lobby & Michael's email list, they send out a "40% off one item" coupon every couple of weeks, knocking the price of the kit down to around $40. The kit is also available through Hobby Lobby's online store (you can use their coupons there, too) which offers flat $4.95 shipping, so you should never have to pay more than fifty bucks for the kit, if you're willing to wait until you get a good coupon.
So here's everything that comes in the kit:


Before we can cast anything, the mold has to be created first. The first step is to make a box that will contain the originals. I used some scrap pieces of foamcore I had laying around my studio. Cut out what will be the "bottom" of the box, leaving at least 1/2" between your pieces and around the perimeter. Glue down the originals with super glue:


Next the sides are added to the box. The box has to hold the rubber when it's in it's liquid state without leaking - the casting kit includes clay to seal all the edges, but I used hot glue, inside and out, to seal the box:


Seriously, you do not want this box to leak. You will have a mess of epic proportions on your hands if it does.

I then wrapped the whole box with duct tape, to add strength, since hot glue isn't the strongest bond:


Okay, now we're finally ready to mix some chemicals. But first:

**SAFETY WARNING** **SAFETY WARNING** **SAFETY WARNING**

Seriously, guys, we are working with some potentially nasty chemicals here, that work by means of a chemical reaction. Follow all safety precautions - eye protection, at least a mask (a respirator is better), gloves, and work in a well-ventilated area. Don't touch your eyes or your mouth when you're working with the chemicals, and wash your hands thoroughly when you're done. In addition, resin is exothermic, meaning it generates heat as it cures - while it doesn't get extremely hot, if you are pouring it at your painting desk where there are lots of flammable paints, thinners, etc., it is something to keep in mind.

**WARNING OFF** **WARNING OFF** **WARNING OFF** **WARNING OFF**

Okay then. We start with the RTV silicone:


You'll notice that one of the first steps in the instructions for the silicone is to "stir well". The problem is, when you open it you get something like this:


(Actually, the above image is after about five minutes of vigorous stirring). I can almost guarantee that when you open the jar you'll think "I must have got a bad batch - this will never work!" It looks like dried-out plaster with a tiny bit of liquid floating on top. Nevertheless, grab something and start stirring. The flimsy little popsicle sticks they give you with the kit aren't gonna cut it - I used a stout-handled paintbrush, but seriously considered sacrificing an old screwdriver. Mash it up against the sides, poke it, do whatever you need to do to break up all the chunks and get it as smooth as possible. Stir it until your arm hurts, then give it to your buddy and let him stir it for a while, then take it back and stir it some more.

After it's as smooth as you can get it, add the catalyst:


Stir it rapidly until the color is uniform. You have about 30 minutes of "open" time until the rubber sets, so you don't need to rush. The catalyst will also "smooth out" the silicone a bit. After it's thoroughly mixed, pour it into the box containing your original bases:


Set the box on a level surface to dry for at least four hours.

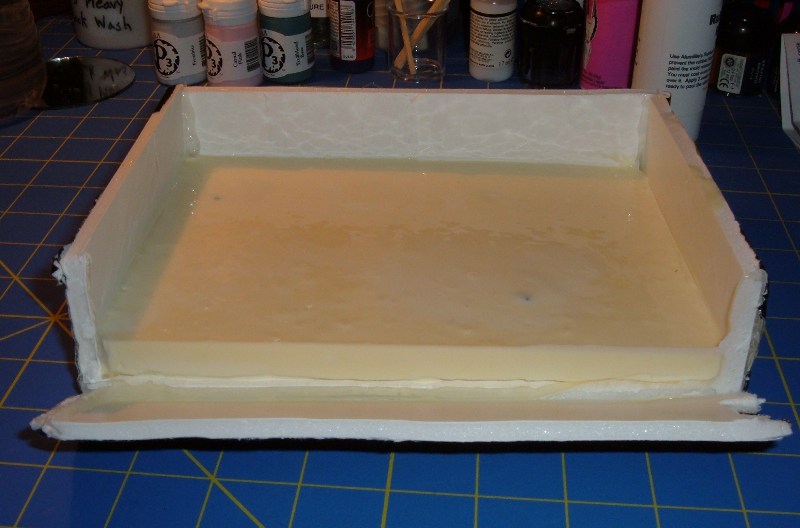
After four hours have passed, you should be ready to "de-mold" your originals. I ran my hobby knife around the edges, then cut the box apart:


Get all the paper/glue/etc. off of the rubber, then CAREFULLY start to pry the rubber off the bottom of the box:


I was having some trouble getting the mold to pull smoothly away - I decided to bend the foamcore and break the bond of the super glue, to allow me more room to work:


This allowed me to work from the top down. The problem was that some of my "urban wasteland" bases hung over the edge a bit too much, making them difficult to take out of the mold. This actually didn't cause a problem with casting - I just made some small relief cuts around the edge of the mold. (These will tear and ruin the mold if you bend it too much, though). The two particular bases that were giving me trouble were also the ones that I was concerned were too tall - I might just cast a few of those for my HQ, and skip casting them in the future.

Most of my trench bases left their materials behind - no big deal though: I picked most of the pieces out by hand, and used my decal tweezers for the stubborn bits:


I then used a old, soft toothbrush I keep with my paintbrushes to brush the last of the debris out of the mold.

Ready to cast!

The first step in casting is to prepare your mold. You don't need the mold release that comes in the kit (that's only used if you are casting rubber-against-rubber). All you need to do is sprinkle a bit of baby powder in your mold:


...then take a dry paintbrush and "paint" the powder around on all surfaces of the mold:


Hold the mold over your trash can and gently smack it a few times to get the excess powder off:


Now we can mix the resin:


The kit contains a two-part resin, with an "A" side (the clear bottle) and a "B" side. The "B" side needs to be thoroughly shaken before pouring.

The two parts of the resin are mixed at a 1:1 ratio. Fill two of the mixing cups that come with the kit with the same amount of the two types of resin:


Pour them in a (preferably disposable) container, and mix vigorously for 30 seconds:


Once the resin is mixed thoroughly, you can begin pouring it into your mold:


IMPORTANT: You only have NINETY SECONDS until the resin hardens - THEY ARE NOT KIDDING ABOUT THIS. To illustrate my point:


I was pouring my next-to-last base when I hit the 90-second mark - in a blink of an eye, the resin changed color, and then it was SOLID. So work fast.

"But wait", I hear some of you saying, "You said to stir the resin for THIRTY seconds - that uses up 1/3rd of my open time before I've even started the pour. Surely I can skimp on the stirring a little bit to buy a few extra seconds?"

No, you can't. Why? Because you'll just end up with slushy, sticky piles of junk, like this:


...and you'll spend an hour or so trying to clean the mess out of your mold without damaging it. So do as it says in the instructions, already.

I was unsure about how much resin I needed the first time I poured it, and wound up mixing too much - it turns out I only need about 1.25 ounces to cast ten bases. The resin also expands a bit as it cures, so, it's best to "under-pour" each mold by a bit. Part of the problem is that I need to use a smaller container while pouring, to give me better control.

Here's some bases out of my first attempt:


As you can see, the details are replicated nicely. Some of these are a lost cause, though, because I poured too much resin in the mold - the bases won't sit flat.

For my second attempt, I worked a bit faster and "skimmed" the excess resin off the mold before it hardened:


This worked pretty well - it allowed me to snap off a lot of the excess resin before I even removed the bases from the mold:


And here's the results of the second casting:


All of these bases will work well, with just the usual bit of trimming & sanding around the edges.

(Update: I eventually just switched to mixing the resin in small disposable paper cups (like the "Dixie" -brand cups) - this gave me MUCH greater control while pouring the resin, and eliminated the need to "skim" the mold, or anything like that).

So, overall, it's a pretty neat process - it allows me to create a ton of custom bases, without having to build every single one of them. I need 1.25 ounces of resin to cast ten bases, and the kit includes 28 ounces of casting resin - that means I can cast two hundred and twenty-four bases with what's included with the kit. I paid $42 for the kit (after my 40% coupon), so that comes to around 18 cents per base. Seeing as resin bases usually cost anywhere from $2 - $10 from a retailer, it's a pretty good deal - Once you have the mold, you can buy just the resin for around $1 per ounce, making it even cheaper...