
Unfortunately I didn't take pics of the actual building phase, since I had my hands full & it was early on a Thursday morning and I didn't think of it. But, the piece is entirely made of 1" styrofoam, cardstock, and foamcore board. The basic idea is that a 1" column is glued to a cardboard base, and 1" square blocks of styrofoam are used to create a spiral-type staircase around the column. The basic structure shouldn't be too hard to figure out. The important thing here is the construction of the stairs - I'll try to illustrate using my 133t MicroSoft Paint skillz:
 (click to enlarge)
Basically, by aligning the top two steps with the top of the cardstock square and the bottom two steps with the bottom, it leaves a perfect-sized gap to insert the base of your minis during a game.
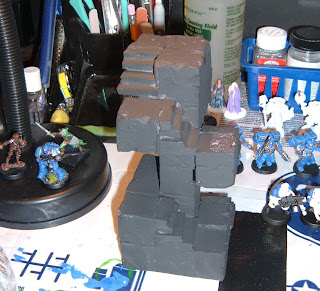
So, the rest of this entry will deal with the painting. Regular spray paint will dissolve Styrofoam, so I gave the entire piece a generous coat of PVA glue and let if dry a couple of days. (You can buy special Styrofoam-friendly spray paint, but it's expensive, and glue is cheap). After it dried, I gave the whole piece a coat of black primer:
I was given a gift of 60 or 70 bottles of craft-store paint that belonged to my late mother-in-law, so I use that to paint my terrain - it's much cheaper than using your hobby paints. I roughed in the staircases with brown and block structure with slate gray:

Next, I gave all of the gray a thick wash of Citadel Badab Black wash:
 The steps got a wash of Citadel Devlan Mud wash:

Next, the steps, were drybrushed lightly with a 50/50 mix of the basecoat brown and yellow. This gave a nice "wood grain" effect (hard to see in the pic).

Next, the stone surfaces were heavily drybrushed with a 50/50 mix of the basecoat gray & white:

Next, I made a 50/50 mix off Vallejo Game Color Black Green ink & P3 Yellow ink and added it to Vallejo Glaze medium:

The trick here is that no matter how good you coat your terrain with PVA, there's going to be spots where the spray paint eats into the foam a bit. Instead of trying to repair or hide these spots, I actually use the ink glaze to highlight it, as a "green slime" effect. Now when someone looks at your terrain piece, instead of thinking "Geez, he's so lazy he didn't coat it well enough" it looks like "Whoa, he even sculpted the acid slime effect!" Remember: Work smarter, not harder. ;-)

Here's the final product:
 Overall a quick, fun project to make.
So, the rest of this entry will deal with the painting. Regular spray paint will dissolve Styrofoam, so I gave the entire piece a generous coat of PVA glue and let if dry a couple of days. (You can buy special Styrofoam-friendly spray paint, but it's expensive, and glue is cheap). After it dried, I gave the whole piece a coat of black primer:

I was given a gift of 60 or 70 bottles of craft-store paint that belonged to my late mother-in-law, so I use that to paint my terrain - it's much cheaper than using your hobby paints. I roughed in the staircases with brown and block structure with slate gray:

Next, I gave all of the gray a thick wash of Citadel Badab Black wash:
 The steps got a wash of Citadel Devlan Mud wash:
Next, the steps, were drybrushed lightly with a 50/50 mix of the basecoat brown and yellow. This gave a nice "wood grain" effect (hard to see in the pic).

Next, the stone surfaces were heavily drybrushed with a 50/50 mix of the basecoat gray & white:

Next, I made a 50/50 mix off Vallejo Game Color Black Green ink & P3 Yellow ink and added it to Vallejo Glaze medium:

The trick here is that no matter how good you coat your terrain with PVA, there's going to be spots where the spray paint eats into the foam a bit. Instead of trying to repair or hide these spots, I actually use the ink glaze to highlight it, as a "green slime" effect. Now when someone looks at your terrain piece, instead of thinking "Geez, he's so lazy he didn't coat it well enough" it looks like "Whoa, he even sculpted the acid slime effect!" Remember: Work smarter, not harder. ;-)

Here's the final product:
 Overall a quick, fun project to make.
Brilliant! The l33t paint picture didn't really sell the idea, but the final photo did. Nice!
ReplyDelete