The next part of rebuilding the heap of a Gyrocopter I bought is fabricating a new blade assembly. I decided to make it in one piece for strength, and to magnetize it so it could be removed for easy packing in a transport case. I started by grabbing some scrap cardboard out of the recycling bin and sketching a blade shape that I liked:
...then I cut it out and used it to transfer the pattern to a sheet of plasticard:
The middle was a bit wobbly, so I reinforced it with a bit of plasticard, then added some Green Stuff to mount the magnet to:
Next, I grabbed some styrene tubing and build a "frame" - the plan here is to paint these with a "wood grain" effect so they look like wooden poles:
I sculpted some ropes out of Green Stuff, to look like they're tying the frame together and to hide the gaps a bit:
Next, I used some scrap plasticard and a small hole punch to make some "rivets":
Primered:
I used black paint, P3 brown ink, & Vallejo Game Ink smokey brown for the wood effect:
I picked up a pack of flight bases at my FLGS and sculpted a mounting spot for one:
Finished model:
Overall, I'm pretty pleased (especially considering what I started with!)
Showing posts with label Green Stuff. Show all posts
Tuesday, April 8, 2014
Tuesday, April 1, 2014
Dwarfs Part IX: Gyrocopter
...the next thing I decided I needed for my Dwarf army was a standout "centerpiece" model - one that I could heavily convert, try to do a great paint job on, and would generally keep the army from looking like just a big mass of troops. It would also help if it was a model that was popular in Dwarf lists. My first thought was Dwarf High King Thorgrim Grudgebearer:
...but, as I said before, cost is a big factor in building this army - I looked around the usually places, but there were no cheap used versions of this model available. The only other model that really appealed to me was the Gyrocopter:
Looking for a cheap version of this model also proved tough - even pretty busted-up ones were going for a significant chunk of change on eBay. I finally won an auction for one that was missing as many parts as were there:
I waited for it to get here and hoped for the best.
Once the model arrived, I saw how bad it was:
Yikes. No rotors. No gun. No tail stabilizer. Busted landing skids. Dried-up clots of superglue everywhere. Doesn't even look like it was ever cleaned properly.
I chipped off the excess glue the best I could, grabbed my plasticard & Green Stuff, and got to work. First order of business was to replace the missing tail stabilizer:
Next: I reconstructed some struts for the landing skids using styrene tubing:
Tying in the rear stabilizer & customizing an exhaust port:
Next, I needed to replace the main gun - I grabbed a ship's cannon I had in my bitz box from a Reaper Razig weapons pack, but it was too big - so, I cut it down, re-sculpted it, and added a mounting point:
Next up - building the blade assembly!
Image from Games Workshop
...but, as I said before, cost is a big factor in building this army - I looked around the usually places, but there were no cheap used versions of this model available. The only other model that really appealed to me was the Gyrocopter:
Image from Games Workshop
Looking for a cheap version of this model also proved tough - even pretty busted-up ones were going for a significant chunk of change on eBay. I finally won an auction for one that was missing as many parts as were there:
Pic from auction listing
I waited for it to get here and hoped for the best.
Once the model arrived, I saw how bad it was:
Yikes. No rotors. No gun. No tail stabilizer. Busted landing skids. Dried-up clots of superglue everywhere. Doesn't even look like it was ever cleaned properly.
I chipped off the excess glue the best I could, grabbed my plasticard & Green Stuff, and got to work. First order of business was to replace the missing tail stabilizer:
Next: I reconstructed some struts for the landing skids using styrene tubing:
Tying in the rear stabilizer & customizing an exhaust port:
Next, I needed to replace the main gun - I grabbed a ship's cannon I had in my bitz box from a Reaper Razig weapons pack, but it was too big - so, I cut it down, re-sculpted it, and added a mounting point:
Next up - building the blade assembly!
Tuesday, September 17, 2013
Magnetizing the Khador Heavy Warjack Kit
...a while ago I bought the Khador Heavy Warjack kit - This is a single kit that allows you to build a Demolisher, Devastator, or a Spriggan. I didn't want to limit myself, so I decided to magnetize the interchangeable components, so I could use whichever one I wanted. As this was the first model I've built in a loooong time, I was a bit rusty, and it took me a while - I didn't document the entire process, but here's the highlights:
The interchangeable parts for the warjack are the weapon arms, shoulder pads, heads, and the armored shroud covering the head. The basic process for all the bits is the same - drill a hole slightly bigger than the magnet as deep as possible in each side, fill the hole with a tiny bit of superglue and Green Stuff, press the magnets into the hole, and remove the excess. You have to make sure the poles of the magnets are aligned properly.
Magnetizing the shoulder pad
The middle part of the arms of this model were really weak and kept flexing - I built them up with several layers of Citadel's Liquid Green Stuff, and will file them into shape when it cures.
Magnetizing the front carapace
Filing excess Green Stuff after it has cured
Drilled out the barrels of the cannons on the Spriggan shouldpads
Mostly finished. Since the head is almost completely concealed by the armored carapace, I opted to just use a single head, since magnetizing it would be awfully fidgety, and they're so small that they'd be waaay too easy to lose
...and that's about it for the build. Next I have to find a way to prime it without covering up the magnets...
Tuesday, May 7, 2013
Old Witch of Khador & Scrapjack
...so I celebrated my return from Adepticon 2013 by building a model I got at Adepticon 2012 - the Old Witch of Khador & Scrapjack:
I really like these models fluff-wise & aesthetically, but the sculpts are shamefully bad - I know this isn't really a hugely popular caster choice for Khador, but Privateer Press should make re-releasing this model in plastic a priority ASAP. You pretty much have to sculpt the entire back of the Old Witch freehand to have a usable model, and there is literally no way to pin the legs on the Scrapjack to give it any structural integrity - I had to sculpt "bands" around the knee joints out of Green Stuff (I gave them the impressions of rivets using a pen barrel) to hopefully help them hold together. This was my first attempt at a significant amount of freehand sculpting / gap filling in quite a while, though, and I'm pretty pleased with how it turned out...
Friday, May 6, 2011
Magnets - How Do They Work?
(With apologies for using a played-out Internet meme as a title)
...so I've been sitting on three Land Raider kits for a while now - I finally got a chance to build one, and decided to magnetize it.
(Quick explanation for my non-wargaming friends who follow my blog: Model kits often include several different weapon options that you can use. If you glue the model together, you're stuck with that weapon (no pun intended). Cheap-@$$ wargamers figured out a while ago that if we use magnets to attach the weapons, we can swap them out at will, rather than having to buy a whole new model kit to have different weapons. Got it? Okay.)
Step one: build a Land Raider, but don't glue on the weapons. (Sorry, I didn't document the early stages of building. It was uneventful anyway).
For this model, I bought the Black Templar hatch & doors from a bitz seller. I usually glue the doors down for simplicity's sake, but this time I decided to magnetize them so I could paint the cool interior details behind the hatches.
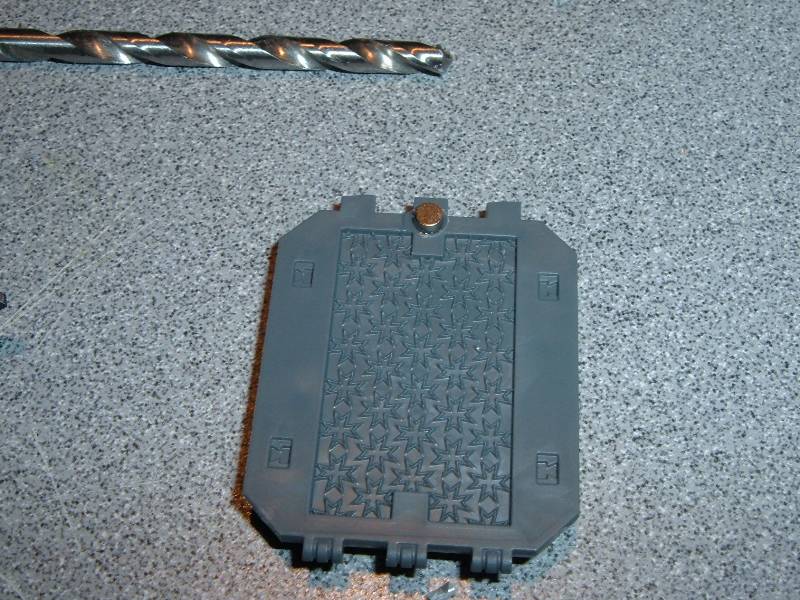
I started by drilling a hole at the top of the hatch:
Then I mixed up some Green Stuff:
I grabbed my neodymium magnets - these are 1/8" x 1/16". (I bought these a long time ago on eBay - I don't think the web site on the label is even active anymore).
Then I drilled a corresponding hole on the door - first I used a small drill bit and drilled about halfway through the door, then I used a large bit to open up the diameter of the hole, to make a "pocket" for the magnet to sit in:
Then I used superglue to attach the magnet to the door:
Then I squished some Green Stuff behind the hole on the Land Raider:
...and pressed a magnet into the Green Stuff from the front (making sure the right pole was facing out!)
After everything is dry, the door fits securely:
The other side received the same treatment:
Next, I magnetized the Assault Cannons - there's no real reason to magnetize these right now since no alternate weapons are included in the Crusader/Redeemer kit, but I might happen across a set of Heavy Bolters someday.
Next, I started on the rear hatch - this was trickier, because in order to get the magnets to line up with the turrets correctly but still remain hidden, one had to be in centered really close to the edge of the hole. I started by drilling the holes where I needed them:
Then I opened them up with one of my files:
I squished some Green Stuff underneath the first hole and inserted the magnet:
I added some Green Stuff underneath & to the side of the hole that was on the edge of the opening:
I inserted the magnet, then used a toothpick to smooth it a bit (this was after I absent-mindedly tried using my metal sculpting tool, and the magnet ripped out and attached itself to my tool - d'oh!)
Next I attached magnets to the Meltagun:
Then I built the gunner option:
He received a Black Templar head & shoulderpads:
After the magnets were attached:
Next, I wanted a "plain closed hatch" option - I don't expect to use this much, but I wanted to have the option anyway. The problem was, I didn't have any more of the turret rings - I found these parts left over from An Ork Battlewagon sprue:
I "de-Orkified" the turrent by shaving off the triangle-shaped edging, then kludged them together into a hatch assembly:
I had to trim away one edge of the bottom of the assembly, since it wouldn't clear the magnet properly - this won't be seen when it's attached:
It doesn't look fantastic or anything, but I'm betting once the model is painted it won't stand out much.
The Flamers
I did build the Flamers that came with this kit:
However, I didn't magnetize them right now for several reasons: First, the easiest way to do this would be to have a whole second set of the hatch inserts & sponson mounts. If you check around with the bitz sellers, a set of these is going for around $15, so I'd have close to twenty bucks in it after shipping costs, and that still wouldn't include the exterior armor plates. That's starting to not be a good value - I have three Land Raider Crusaders, and by the time I gathered the parts for all three, I could have just bought another model. While I could magnetize just the vertical sponson supports & the armor plates, I feel this would be way too fidgety. Also, since I'm a bit of a fluff bunny, and these Land Raiders are for my Black Templar army, I really can't see myself not running them as Crusaders, since the Templars were the chapter that originated the design. But, maybe I'll come across the parts I need on the cheap someday, so I thought I'd keep 'em around.
Next, I finished drilling out all the weapon barrels & cleaning up mold lines:
Then, I added lots of Templar-y goodness:
Forge World brass etch:
...and this cool decorated armor plate from Scibor:
With all the magnetized accessories:
With common load out:
Threatening my in-progress Freebootas!
I'm pretty happy with how it came out - the magnets are almost completely unnoticeable when the weapons are attached. I may not get around to building the others until after I get back from Adepticon, so I might have to look for additional bits while I'm there...
...so I've been sitting on three Land Raider kits for a while now - I finally got a chance to build one, and decided to magnetize it.
(Quick explanation for my non-wargaming friends who follow my blog: Model kits often include several different weapon options that you can use. If you glue the model together, you're stuck with that weapon (no pun intended). Cheap-@$$ wargamers figured out a while ago that if we use magnets to attach the weapons, we can swap them out at will, rather than having to buy a whole new model kit to have different weapons. Got it? Okay.)
Step one: build a Land Raider, but don't glue on the weapons. (Sorry, I didn't document the early stages of building. It was uneventful anyway).
For this model, I bought the Black Templar hatch & doors from a bitz seller. I usually glue the doors down for simplicity's sake, but this time I decided to magnetize them so I could paint the cool interior details behind the hatches.
I started by drilling a hole at the top of the hatch:
Then I mixed up some Green Stuff:
I grabbed my neodymium magnets - these are 1/8" x 1/16". (I bought these a long time ago on eBay - I don't think the web site on the label is even active anymore).
Then I drilled a corresponding hole on the door - first I used a small drill bit and drilled about halfway through the door, then I used a large bit to open up the diameter of the hole, to make a "pocket" for the magnet to sit in:
Then I used superglue to attach the magnet to the door:
Then I squished some Green Stuff behind the hole on the Land Raider:
...and pressed a magnet into the Green Stuff from the front (making sure the right pole was facing out!)
After everything is dry, the door fits securely:
The other side received the same treatment:
Next, I magnetized the Assault Cannons - there's no real reason to magnetize these right now since no alternate weapons are included in the Crusader/Redeemer kit, but I might happen across a set of Heavy Bolters someday.
Next, I started on the rear hatch - this was trickier, because in order to get the magnets to line up with the turrets correctly but still remain hidden, one had to be in centered really close to the edge of the hole. I started by drilling the holes where I needed them:
Then I opened them up with one of my files:
I squished some Green Stuff underneath the first hole and inserted the magnet:
I added some Green Stuff underneath & to the side of the hole that was on the edge of the opening:
I inserted the magnet, then used a toothpick to smooth it a bit (this was after I absent-mindedly tried using my metal sculpting tool, and the magnet ripped out and attached itself to my tool - d'oh!)
Next I attached magnets to the Meltagun:
Then I built the gunner option:
He received a Black Templar head & shoulderpads:
After the magnets were attached:
Next, I wanted a "plain closed hatch" option - I don't expect to use this much, but I wanted to have the option anyway. The problem was, I didn't have any more of the turret rings - I found these parts left over from An Ork Battlewagon sprue:
I "de-Orkified" the turrent by shaving off the triangle-shaped edging, then kludged them together into a hatch assembly:
I had to trim away one edge of the bottom of the assembly, since it wouldn't clear the magnet properly - this won't be seen when it's attached:
It doesn't look fantastic or anything, but I'm betting once the model is painted it won't stand out much.
The Flamers
I did build the Flamers that came with this kit:
However, I didn't magnetize them right now for several reasons: First, the easiest way to do this would be to have a whole second set of the hatch inserts & sponson mounts. If you check around with the bitz sellers, a set of these is going for around $15, so I'd have close to twenty bucks in it after shipping costs, and that still wouldn't include the exterior armor plates. That's starting to not be a good value - I have three Land Raider Crusaders, and by the time I gathered the parts for all three, I could have just bought another model. While I could magnetize just the vertical sponson supports & the armor plates, I feel this would be way too fidgety. Also, since I'm a bit of a fluff bunny, and these Land Raiders are for my Black Templar army, I really can't see myself not running them as Crusaders, since the Templars were the chapter that originated the design. But, maybe I'll come across the parts I need on the cheap someday, so I thought I'd keep 'em around.
Next, I finished drilling out all the weapon barrels & cleaning up mold lines:
Then, I added lots of Templar-y goodness:
Forge World brass etch:
...and this cool decorated armor plate from Scibor:
With all the magnetized accessories:
With common load out:
Threatening my in-progress Freebootas!
I'm pretty happy with how it came out - the magnets are almost completely unnoticeable when the weapons are attached. I may not get around to building the others until after I get back from Adepticon, so I might have to look for additional bits while I'm there...
Subscribe to:
Posts (Atom)