Showing posts with label Tools. Show all posts

Thursday, April 23, 2015

Hobby Time!

One of the deals I struck for my birthday was for some hobby time - I was off work, the baby was at Grandma's, and my wife was working, so lars4life & I got to spend a day hobbying:


It felt good to be working on stuff again.  Above you can see my new portable set-up, which I'll be detailing in an upcoming post...

Thursday, May 29, 2014

Review: Paintier 80

     Lately I've been giving my hobby area a considerable re-working - since we bought a house, I have a space in the basement, but it's also being used for storage until we get around to finishing it, and it's a mess.  Previously, I had been using the P3 Paint Bag for my most-commonly-used paints & tools - it was nice because it zipped to my Warmachine bag, so I could grab the whole thing & head out to a friend's house to build & paint some models without trying to throw a bunch of stuff in a shoebox or something.  The downsides were that 1.) it made my bag a lot bulkier & heavier; 2.) it didn't even hold the majority of my paint collection - I still had two P.A.C.K. 216's with over 150 bottles of paint that I'd have to grab if I thought I needed more than the basics; and 3.) I recently changed shifts at work, and it looks like I'll eventually be free to do a lot more painting at home as opposed to on-the-go, so the P3 bag didn't make as much sense anymore.  I started looking for solutions to have all my paints available at my desk, and after searching the blogs & forums I came across the Paintier 80 Carrousel Organizer:


This had fairly good reviews, so I figured I'd give it a shot - I new I'd need at least two to hold all my paints, but I thought I'd order just one at first to see how it would work out.  You can order it directly through their website, but I was able to find them a bit cheaper on both Amazon & eBay.  If you want a smaller version, they also offer a 40-slot version for a bit less.

I was a little worried about it being plastic - after it arrived, I removed all the parts from the box:


I wasn't worried about how sturdy it was after seeing the parts - the plastic is thick & sturdy.  (Think of the plastic used in those heavy five-gallon industrial buckets, and you're not far off).  The "lazy susan" attached to the bottom tray is steel and obviously heavy-duty.  It also came with bolts of various lengths for assembly, top cap assembly, pastic tubing for the center column, and instructions.  

There are four different configurations you can choose to assemble - since I have many different paints from GW, Reaper, Vallejo, PW, Badger, Tamiya, etc., and will be using the Paintier to also store miscellaneous bottles, of glue, weathering powders, fixatives etc., I just picked the configuration that would give me the most space between each shelf - the instructions aren't terribly helpful (you can't really tell which length bolt or piece of tubing to use from the simple drawings), with a bit of fidgeting it wasn't too hard to figure out.


Next, I started loading up all my paints:


Overall, it worked great:


In fact, it worked so well, I went ahead and ordered another:


(I actually screwed up here, I should have put the dropper bottles in the Paintier that I assembled in the taller configuration.  Oh well - I'm fairly sure that as I live with these far a while, they'll get rearranged many times).


...overall, a good solution for organizing your paints.  It's a bit pricey, but holds a ton of paint, and is surprisingly sturdy (I doubt you could even accidentally break it, I think you'd have to intentionally smash it into a concrete floor to crack it).  It does take up a lot of room, so if you're hobby area is a small student-sized desk or something, it might not be for you - but if you've got the space and are looking for a way to organize your stuff, it's a good choice.

Tuesday, April 29, 2014

New Tools

Picked up a few new tools today:


I have really bad luck with files - I loved the first set I got off eBay years ago, but a few have broken, and the rest are clogged with Green Stuff (no matter how much I've tried cleaning or wire brushing them).  The next set I got just plain sucked - the abrasive sections weren't cut deep enough, and they didn't do anything.  Then I bought a fancy name-brand set where the files screwed into a handle - sounds good, but this really hampered my ability to get into tight spaces.  The ones above finally seem to be what I'm looking for, and there's enough of them to outfit two hobby kits (more about that soon).


I realized lately when I'm pinning a model, I spend more time struggling with the drill and breaking bits than making progress - probably because all my bits were five years old and so dull they wouldn't make a hole in warm butter.  I decided to chuck 'em all and start over.  One of the few places I've found that sells a set with reeeealllly small bits included is Harbor Freight - the quality is kinda crappy, but when you get this many without the "repackaged by a hobby company = 300% markup" factor, I can live with it...

Friday, October 4, 2013

The Easy-Bake Oven of the Emperor


...okay, not quite.  But a few years ago I was fortunate enough to attend a sculpting class at Origins with Sandra Garrity - even if you haven't heard of Sandra, if you've accumulated any fantasy miniatures in the past 25 years, you probably own one of her sculpts.  Sandra had these very cool homemade "ovens" that she would put the miniatures we were working on into, that basically "cooked" them with a light bulb to speed up the curing process - you can see just the top of one of these ovens at the bottom edge of this picture of her:


(Picture from Jason Azze's web page) 

As I've been doing more conversion & sculpting lately, I decided to see if I could slap together my own version.

**WARNING** During this project, I'll be working with sharp tools, jagged metal, and building something that generates a lot of heat.  BE CAREFUL.  If you decide to build this and chop off your finger in the process or burn down your house with the finished product, I'm not responsible.  Never leave the curing oven unattended, and have a fire extinguisher nearby while using it.**

From what I was able to see, there were two basic components to the curing oven: a large can (I would say "a five-pound coffee can", but I don't think anyone has sold coffee in tin cans for years now) and a clamp on work light.  Since it was the end of gardening season, my wife was processing tomatoes into spaghetti & pizza sauce - she supplements the home-grown tomatoes with canned tomato sauce to make it go farther.  When I saw her picking up a few small cans of tomato sauce at the store, I talked into buying the six-pound can, just so I'd have something to use:


I measured the diameter of the can - it was just over six inches.  The next time I ran to Home Depot, I picked up an 8-1/2" clamp-on work light:


I also picked up some hardware:


...some small hooks & eyes, some small hinges, and some self-tapping sheet metal screws.  One more important ingredient:


JB Weld SteelStik - this is a two-part epoxy putty (similar to Green Stuff) but is specifically made to bond to metal, and to withstand higher temperatures.

I gathered some tools that would make this project easier:


A pop-rivet gun, rotary tool, and a pair of tin snips - of all the above, I would say only the tin snips are "required".  You'll also need a knife (preferably one with a stout fixed or locking blade, that you don't mind possibly ruining), and a can opener (preferably a "fixed" style, like a P38 or the kind on a Swiss Army knife - not a rotary or electric style).

Okay, first step: open, empty, & wash out your can.  Remove the label; you can clean off any glue from the label with some WD-40.

You'll probably have some jagged edges on the can: pull any large pieces off with pliers, then go all around the edge of the can & "smash" any sharp bits flat:


Next, we need to work on creating an opening for the "door".  We want to start a cut on the horizontal surface of the can, so you'll probably need to poke a small hole with a knife along the bottom edge of the can to get started.  Be careful - if you're using a folding knife (which I specifically told you not to do), it's going to want to try to close on your fingers.  After you get an opening started, use your can opener to cut the bottom of the opening:


You want the opening to be, oh, five or six inches long - long enough that you can comfortable reach inside to change the bulb without scraping your wrists on jagged metal.  After the first opening is cut, we need to start the vertical cut - you'll probably need to use your knife again to get it started:


Once you've gotten it started, you can get the tin snips in there to cut it the rest of the way:


(Don't worry too much about the warping, you can straighten it out later).  Obviously if you had a strong rotary tool with a metal cut-off wheel or an oscillating tool with a metal-cutting blade, you could do this much more cleanly - my cheap battery-powered rotary tool wound up being mostly worthless, so this is what I had to work with.

Use the tin snips to finish cutting the rectangle out of the can:


After the "door" is completely cut from the can, use your pliers as before to clean up the edge, and re-shape the door to fit the contour of the can as best you can.  (If you have a small tack hammer or ball-peen hammer, you can hammer along the edges while holding a small portion at a time on a hard surface, like a work bench).


Next, mark the location & drill pilot holes for the hinges:


I attached the hinges with pop rivets (you could also use machine screws):


After the door was on, I added a hook and eye to keep the door closed when it's in use:


Next, we can attach the light.  (You can remove the clamp; it's not needed).  I set the lamp on top of the can, then drilled pilot holes for a couple of sheet-metal screws:


I sunk a sheet-metal screw in each side, just to hold the lamp on while I worked.  Next, I grabbed some of the SteelStik and mixed up a bit:


NOTE: The SteelStik putty dries WAAAY faster than Green Stuff - it's only workable for about five minutes.  Work in small batches - the first time I mixed up way too much, and wound up throwing out a big wad of it.

I used the SteelStik putty to seal up all around the edge, where the lamp meets the can:


I also sealed up the vent holes at the top of the lamp (I figure there's plenty of gaps around the door), and put a wad on the back of the hook & eye screws to keep them from backing out later on.

After yet another re-shaping / de-burring of the door:


...and that's pretty much it - not terribly pretty, but workable for a first attempt.  As I said, next time I'll use my oscillating tool or a spiral saw to get the opening cleaner.  You'll have to experiment to find the best (and SAFEST) wattage bulb to use - keep in mind that a 100-watt incandescent bulb can reach over 200 degrees Fahrenheit and warp plastic, so I recommend starting with lower wattage.  I think I had less than $20 in this whole project (the clamp light & epoxy putty are the most expensive parts of the project).  

Thursday, May 16, 2013

"...and then the guy jumps out and yells, "Supplies!"

One of the places I've been meaning to take a trip to forever is Dick Blick, a "fine art" supplies store that happens to have a brick-and-mortar location not far from my neighborhood.  I budgeted a little bit of money and made a trip there the other day to get some things I've been meaning to pick up for quite some time:

Airbrush Medium:


Until now, I've been using rubbing alcohol to thin my hobby acrylics for airbrush use, which has good points and bad points.  I've been meaning to try dedicated airbrush medium for a while, but none of the Michael's / Hobby Lobby -type store carry it, so I finally made a trip to pick some up - details as I experiment with it.

Water-Mixable Oil Paints:


At Adepticon this year Les Bursley gave us a demonstration of how he uses oil washes . Needless to say, I immediately wanted to try it.  During the demo, Les actually used Winsor Newton water mixable oil paints & water, as opposed to traditional oil paints & mineral spirits - The trade off is it's slightly more work, but less cleanup & toxic nastiness.  I grabbed Lamp Black & Burnt Umber to experiment with.

Ceramic Palette:


I've seen painters use these at cons for years, but I was never able to bring myself to pay for one, instead opting for the $1.00 plastic versions.  I realized I've bought dozens of those over the years (I throw them out when they get too hard to clean), and I could have had several of these for the same price.  I find myself using a wet palette & airbrush more & more often nowadays, so I only got one for now.

Colour Shapers:


Colour Shapers are actually tools meant for blending & texturing oil paints on canvas, but they are perfect for something else, too: sculpting.  I've taken several classes from professional sculptors at conventions in the past few years, and always loved playing with these - they work a lot better with something like ProCreate putty rather than Green Stuff, but you can really accomplish some cool details with them.

Thursday, May 9, 2013

Restocking Supplies

One of the problems with not building or painting anything for the better part of a year was that when I was going through my paints, there were quite a few that had dried out almost entirely.  I swung by the hobby shop to replace the more frequently used ones that needed replaced:


The Zap-A-Gap was because I like to keep a bottle in my travel kit, as well as one on my desk at home, and the one at home dried up on me.  Replacing the Citadel paints required a bit of research with the Citadel Paint Conversion Chart, as the "new" paints appeared during my downtime, and all the names had changed - most importantly, I was out of Orkhide Shade, and finishing my Orks is pretty high on the priority list.  I didn't notice until later that GW is listing "Caliban Green" as the equivalent for both "Orkhide Shade" and the old "Dark Angels Green" - I have plenty of Dark Angels Green left.  Guess I'll just have do some tests to make sure they match - luckily, the vast majority of my Ork troops are already painted, it's mostly vehicle crew that need finished at this point.

The Vallejo Model Air Fire Red had to be mail-ordered, as none of my local hobby shops stock the model air line, and it's what I use as the base red for my Khador.

Another problem I ran in to was that when we moved last year, our new place has hardwood floors - and my wife used all of my Future floor wax, which I like to use in certain washes and as a flow agent for certain paints.  A couple of years ago the trademark changed hands and SC Johnson renamed it from "Future Floor Finish" to "Pledge With FUTURE Shine" - but the product was still recognizable, because it still had the Future logo on the label.  Well, now that's gone, too, and the product is just called "Pledge FloorCare":


Searching the scale model & rocketry forums, there seems to be a consensus that this is the same product, or at least as close as we're likely to get.  Regardless, I find myself moving away from using this more & more often lately, but I do have some flyers waiting to be built, and it's awesome for treating canopies.  Now I just have to hide it from my wife...

Thursday, September 8, 2011

New Accessory

I got a great new accessory for my studio - I'm really hoping it helps take my painting to the next level:


...well, it'll definitely have some kind of effect on my painting, anyway :-)  I've wanted one of these for a while, since I hate having to run downstairs for a cold drink during marathon painting sessions - I saw them really cheap at a back-to-school sale, so I grabbed one.

And of course I had to make sure it matched the decor:


Friday, July 29, 2011

New Hobby Stuff!

I stopped by the out-of-the-way hobby shop the other day, and picked up some interesting stuff:


As I've mentioned before, this shop is mostly model railroad / scale model / radio-control -oriented, so a lot of times I find some interesting stuff that I don't see at the FLGS.

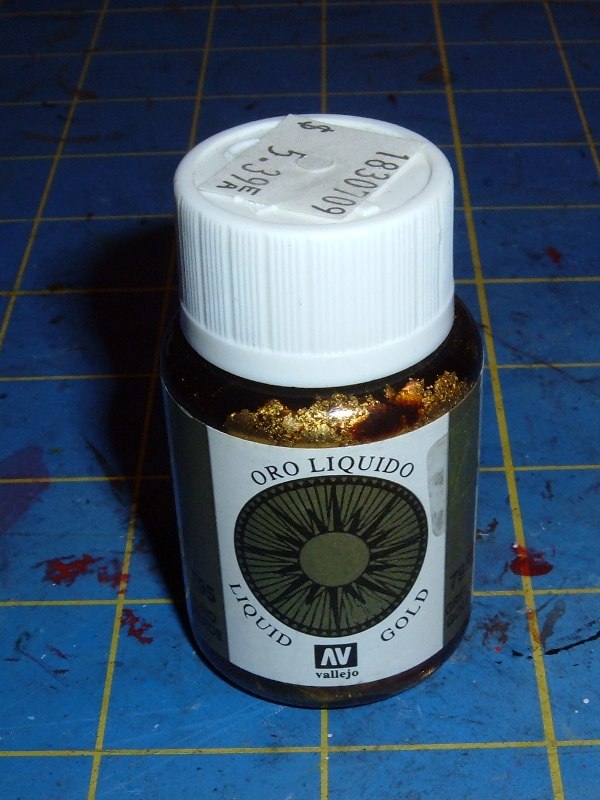
I grabbed some Vallejo "Liquid Gold" metallic paint:


...this looks like it has a WAY higher metallic content than the Game Color line - I have some ideas for my Grey Knights that this might work for.


Nest, I got some Micro Mask, a liquid masking film for airbrushing:


Since I will be painting the Grey Knights entirely with the airbrush, there are some areas where I think this may come in handy...

I also got some more glue (oooh, exciting!)


...and some Testor's sanding films.  I actually used to use these years ago, when I built model cars as a kid - they're kinda handy, and they last a LOT longer than regular sandpaper - once they get clogged, you can "snap" them and clear out a lot of the dust.  They're also stiffer than sandpaper, so you can cut strips to get into tight places and they won't collapse immediately like paper-backed sandpaper would.


I also got a new .005 Micron pen:


...the one I was using wasn't this small, and the tip was getting kinda smushed anyway.  Stay tuned for write-ups & reviews of all of the above!