

...so I'm a big fan of the Venerable Dreadnought model - it's just waaay cooler looking than the standard dread, with the beefier-looking body and the exposed interred Marine. But I just couldn't justify spending $40 on the model, when the going rate for a Dreadnought from Assault on Black Reach is about $15 on eBay. I even have a spare AoBR Dreadnought lying around, so I decided to try to make my own version of a Venerable Dread on the cheap.
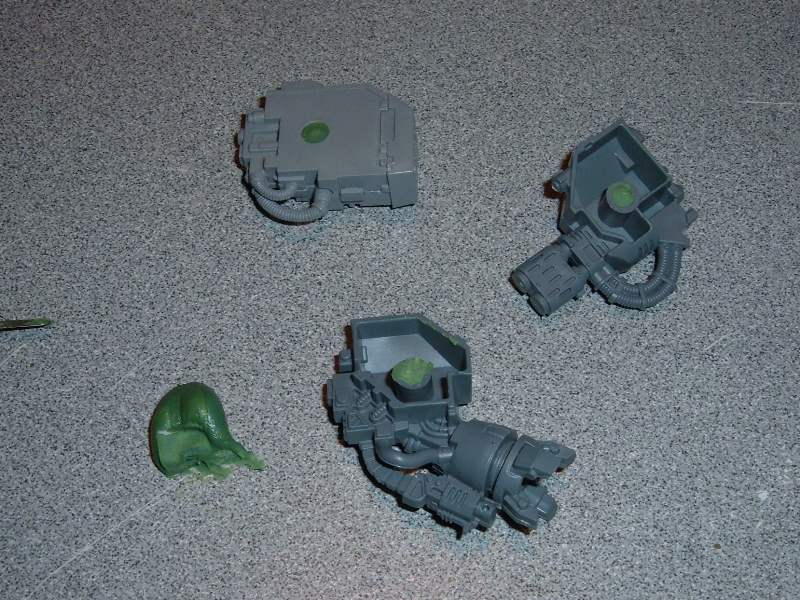
I went to my favorite bitz seller and bought a Venerable Dreadnought torso:

I also bought the interchangeable front panels:

...and here's the AoBR dread that I already had:

I think at this point my total investment was around $7.
Unfortunately, the Black Reach Dread and the Dread from the Venerable kit go together differently - the Venerable Dread's side panels are all one piece, and the torso parts are glued together around them. On the Black Reach Dread, the model is pretty much two pieces, split down the middle - the easiest way (I thought) to go about building this was to use the front half of the torso from the Venerable Dread and the back half from the Black Reach Dread, but to do this I basically had to chop out half of the side panels from the Black Reach Dread:


...then I needed to separate the legs from the Black Reach Dread - the legs are separate pieces on the Venerable Dread kit, and the torso wouldn't fit as-is:


...then I trimmed them a bit and attached them to the back half of the torso:

I trimmed the components off of the Venerable Dread's spacer plate, since I can't use that plate in this build. I temporarily glued them in place:

I also attached the "blank" front panels, since I knew I was going to add a lot of Black Templar iconography to this model:


Then I attached the feet:

I had to chop out the "crossbar" across the top of the torso. I trimmed a piece out of the rear of the Venerable Dread torso and glued in behind where the Marine's head will go to fill the gap:


The next thing that needed attention were some ugly gaps on the inside edges of head area - I used plasticard to cover these:


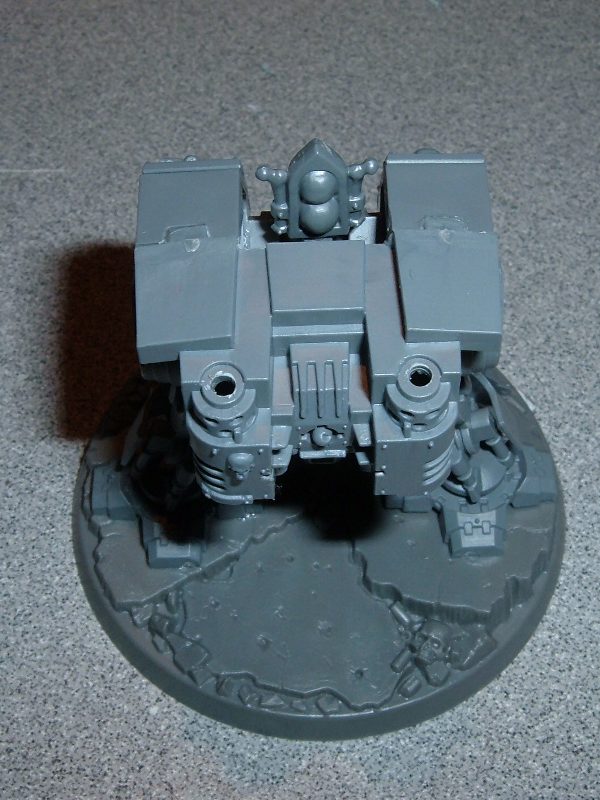
Next I attached the head and assembled the torso:

Next I turned my attention to the weapons - I had the weapon arms from the Black Reach Dread, and a missile launcher from my bitz box:

I decided to magnetize the weapons so they would be interchangeable - for this, I used 1/8" neodymium magnets:

...and I mixed up some Green Stuff:

I filled the holes on the weapons with the Green Stuff:
Then I shortened the mounting posts on the Dread, so the weapons wouldn't stick out to far:

...then I drilled holes for the magnets:

...and filled the holes with Green Stuff & inserted the magnets:


Next, I needed a way to cover the whole behind the Marine's head. I took a backpack shrine from the Black Templar Chapter Conversion Kit and an antenna:

I cut the base of the antenna off and glued it to the shrine, then glued the shrine to the top of the torso:
(While I was back there, I drilled the exhaust stacks out too).
Since I was into my Templar bitz at this point, I added some icons to the weapons:


The next thing I decided to address was the Marine - as I said, the partially visible Marine that's interred in the Dreadnought is one of the main things I like about the Venerable model, and I didn't buy the sarcophagus cover bit - since this Dread will be used with my Black Templar army, I decided to actually emphasize the Marine. Since the Templars use chains so much in their iconography, I would have the Marine chained in to the Dreadnought!
For this, I went to my Freebootas bitz and grabbed some chains from Reaper:

I trimmed a few from the sprue and cleaned them up a bit:

Then I used my pin vice and drilled some holes in the sides of the "cockpit" area:


Then I placed the chains:


Once I had them where I wanted, I glued them in place:

(You can see that I also added someTemplar icons to the front panels & right leg in the above pic).
About this time, it became obvious that the backpack shrine was not going to stay attached very long, plus I didn't care for how it looked - there were still large gaps visible. I removed it and covered the gap with some plasticard:


...then I trimmed the bottom half of the shrine flat, so I would have a greater area of contact to glue:

My next step was to clean up the gaps on the sides - this is mostly for my own edification, since these areas will be mostly covered by the weapons when the arms are attached:


I also covered some of the gaps at the bottom of the torso:


I needed these to dry for a bit, so while they did I moved on to something else.
I decided that I wanted the exhaust stacks to have a "beefier" look, so I started by opening them up a bit with my hobby knife:


Then I cut some styrene tubing and glued it in place:


Then I took some larger-diameter tubing, and attached it to the top half of the exhausts:


...at this point, I returned to the gaps I covered with plasticard - I did quite a bit of trimming to clean up the areas, then I added some of rivets:


I also added some rivets to the exhaust stacks:

I added some rivets to some of the large, flat areas on the original model - the thinking here is that these will help keep my larger, homemade rivets from looking "out-of-place" on the added panels:


I added a smoke launcher & searchlight from a leftover tank sprue in my bitz box:


...overall I'm pretty pleased with how it came out.
UPDATE: I was showing this project to lars4life, and he mentioned that he actually had just received some venerable dreadnought sarcophagus covers in a bitz order and didn't need all of them. He gave me one and I removed the chains and tried it on for size:

...looks pretty good to me! As much as I was happy with the improvised solution with the chains, that different sarcophagus cover is what really makes the Venerable Dreads stand out to me.
I dunno - I kinda like the Templar chained into the body myself.
ReplyDeleteCan we get an update when you've got it painted? I'd like to see how it all turns out in the end.
I liked the chains too, but I think it looks much better in its current form. Nice work man!
ReplyDeleteI like the chains too, but it doesn't make much sense from a fluff standpoint - the "pilot" would have no armor protection, and if the Space Marines only interred their most revered heroes in Dreadnoughts, would they really just chain 'em to the front? I do think it would make an awesome mod for a Chaos Dreadnought, though!
ReplyDeleteJer - I'll post updates on everything here as it's painted - I'm using Citadel spray paint as a basecoat for all my Black Templara, so I'm just waiting for the weather to break so I can spray it all...
Wha! This is awesome full blog i like this sort blog. Respectfully this online journal have this quality huge cost, enhancements, thank for sharing this site.
ReplyDelete2016 military strength ranking
I really like the article in this block is short but interesting to understand.
ReplyDeletetogel singapura