My first order of business was to thoroughly clean ALL the mold lines, flash, etc., from every piece of the model - I had spent a lot of time lusting after this model, and a lot of money; I was damn sure going to build it to the best of my abilities.
Initially, I was impressed with how little work the three main body pieces needed - unfortunately, this trend did not continue:
It was a really poor choice to put the mold vents on a perfectly round area
The wide, flat expanses were the worst - some entire sections needed a skim coating of putty, which was sanded flush after curing to make it flat. Liquid Green Stuff made this job a lot easier.
It was hard to tell if the leg joints were supposed to be flat, or the offsets were intentional - either way, they didn't work. The whole area needed to be reshaped
Air bubbles on the shoulder needed to be filled
Lots of flash on the feet / rear legs. Surprisingly, the metal parts of this kit were overall easier to work with than the plastic pieces
I actually ran out of heavy-gauge brass rod while building this model, and paperclips weren't gonna do the trick - to improvise, I sawed the heads off of some machine screws.
This actually worked quite well, and was extremely sturdy!
After the legs fell apart for the third time, I added one of the machine-screw pins there, too
\
The legs falling apart required a lot of removal / re-shaping of the green stuff work I did previously. The Testor's Sanding Films were a lifesaver here
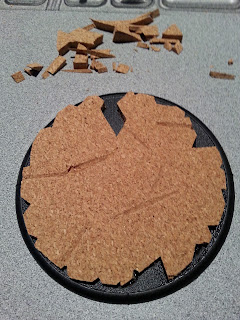
Cutting the cork for the base - I had to dig out a big sheet of cork from my supplies for this project
Base layer glued down
Cutting smaller "rock ledges" to allow me to pose the legs more dynamically
Mostly finished base
Ready for primer
...needless to say, the kit was a bear to put together & finish to a decent standard. I've never really worked with a 28mm model this big before. I've heard that the Forge World Titans can be a huge pain to build, but I've mostly heard people attribute that to the age of the molds - Privateer Press really can't use that excuse. I have some (albeit very basic) experience with casting, and even to a rank amateur like me, some of their choices on where they placed the mold vents puzzled me. Also, this particular model could have used a bit more detail with the instructions than the included 4"x5" diagram - I built the arms wrong THREE FREAKIN' TIMES until I finally figured it out (the "collars" that the hands attach to are fairly plain, but have to be attached in a particular direction for the arm shields to attach properly). Soon, I'll be painting this model using some techniques I've never tried before - check back soon!


I've been a lurker here for some time now but I'd like to say how much I appreciate this kind of blog article. From the box to assembly with a complete feedback on all the hurdles that occurred in the process. No ranting, consistency from roots, actual how-to embedded in entertaining articles. Bonus points for articles o convention visits. Keep going, Paul. Your blog rocks!
ReplyDeleteThanks Sébastien - if you guys keep reading it & commenting, I'll keep writing it!
ReplyDeletehigh blood pressure symptoms
ReplyDeletehigh blood pressure diet
high blood pressure range
high blood pressure medicine
high blood pressure reasons
high blood pressure chart
high blood pressure remedies
high blood pressure tablets
high blood pressure effects
high blood pressure home remedies
high blood pressure home treatment
high blood pressure food
high blood pressure reading
high blood pressure exercise
high blood pressure and sex
high blood pressure and headache
high blood pressure and diabetes
high blood pressure best medicine
high blood pressure how to reduce
high blood pressure in pregnancy
high blood pressure in children
vaginal dryness symptoms
ReplyDeletevaginal dryness cure
vaginal dryness home remedies
vaginal dryness and itching
vaginal dryness before period
vaginal dryness cream
vaginal dryness causes
vaginal dryness coconut oil
vaginal dryness natural remedies
vaginal dryness during pregnancy
vaginal dryness in early pregnancy
vaginal dryness after menopause
vaginal dryness after hysterectomy
vaginal dryness pregnancy
vaginal dryness products
vaginal dryness in 20s
vaginal dryness and pregnancy
anal fissure cream
ReplyDeleteanal fissure meaning
anal fissure treatment
anal fissure ointment
anal fissure symptoms
anal fissure bleeding
anal fissure itching
anal fissure causes
anal fissure medication
anal fissure no pain
anal fissure pain
anal fissure remedies
allergy dust mites treatment
ReplyDeleteallergy dust mite covers
dust mite allergy cure
allergy dust mites
allergy dust mite
allergy dust mites treatment
killing dust mites
dust mites bites
dust allergy tablets
allergy dust mites symptoms
whatsapp video
ReplyDeletewhatsapp app download
whatsapp for pc
No ranting, consistency from roots, actual how-to embedded in entertaining articles. Bonus points for articles o convention visits. Keep going, Paul. Your blog rocks.....
videoder
ReplyDeletevideoder app
if you want apk directly to your android click the links.