Tuesday, August 31, 2010

Freebootas Ahoy!

Well, I had hoped to have some first-hand pictures for you, but a lot of this stuff is apparently on the slow boat from Europe... I've decided to build a Freeboota army. Yeah, I know I'm not the first, but it just sounds like tons of fun to build, so I decided to just go ahead and do it. While there's going to be tons of custon conversion, I am going to be using some aftermarket parts, to at least have a shot of finishing before I retire. Some of the parts I'll be using:

Pirate Ork Heads from MAXMINI:


Razig weapons packs from Reaper Miniatures:


For heavy weapons, the Imperial Arquebus from Freebooter Miniatures:


...and, even though I just cast a hundred or so custom bases specifically for my Orks, I think I'm gonna have to go with the fantastic-looking "Shiver Me Timbers" bases from Iron Halo:


There's going to be a lot of other custom bits as well - stay tuned!

Sunday, August 29, 2010

Ork Deffkoptas

Got a set of Deffkoptas finished:


These are the Deffkoptas from the Assault on Black Reach boxed set. I'm a little torn about these models - they look great and are dead simple to put together - the entire model is only five pieces. And, the individual metal Deffkopta models from Games Workshop are $33 apiece - meaning that these three models are worth the price of the box set alone, and everything else is gravy. (Although the metal model is considerable more "orky" looking, if that's a factor). The downside is that the main part of the model is cast as two halves that snap together, which leaves a huge, ugly seam bisecting the entire perimeter of the model:


You could almost play it off like it was part of the design, but I thought it looked lousy and am far too OCD to leave it as-is, so it required extensive amounts of Green Stuff and filing. I'm tempted to order some more of these from one of the bitz sellers on eBay just 'cause they're such a good deal, but if they're all going to be this much work I think I'll pass...

Friday, August 27, 2010

Ork Trukk

Got an Ork Trukk put together today:


HOLY %&#@$% this thing was a pain to assemble. The entire cockpit/driver/gunner set up was a nightmare, and the diagrams included with the kit were lousy. I think I broke the rollbars off three or four times while assembling it. On the plus side, it required hardly any gap filling - just the driver's shoulders (par for the course with any GW Ork vehicle) and the big exhaust stack. I was afraid it was going to look like a mess when I was done, but by the time I got it all together, filled the gaps, filed the flash, and drilled all the gun barrels/exhaust pipes, it came out pretty nice.

As I hinted at in my last post, I've decided the do my Orks as a "theme" army - I just ordered most of the bits I'll need, and will post pics and reveal the theme soon...

Thursday, August 26, 2010

More Ork Vehicles

Not too much going on here - still assembling the vehicles out of the Ork lot I mentioned earlier. The latest ones finished were a mostly-assembled Warbuggy & Wartrukk:


The Warbuggy was missing the stand for the gun, so I kludged something together out of some bits of sprue:


This doesn't look nearly as good compared to the way GW intended, and I had to trim the grips off of the gun to make it fit. regardless, I wasn't motivated to spend a ton of time on this model, as I don't really care for it that much, and it doesn't fit into the army list I'm building anyway.

The Wartrukk, fortunately, was complete:


Unfortunately, it required tons of fiddly work with Green Stuff to make it look halfway decent - whoever did the initial assembly apparently hacked the parts off of the sprue with a rusty butter knife, leaving divots in the body panels that I had to spend a lot of time filling & sanding. (Just like the '78 Pontiac I had back in high school...) The fit of the driver was abysmal, and the shoulder joints required excessive work. The only good thing was this was one of the few GW vehicle kits I've built where getting the driver/seat/steering assemblies all lined up wasn't a complete nightmare. It's a shame they discontinued this model - while the new Trukk is great, this one offers a great platform for personalizing/converting for a theme army. (Hint, hint...)

Tuesday, August 24, 2010

Ork Warbikes, Converting

I built an Ork Warbiker Squadron the other day - it required a bit of converting that was born of necessity, but I was pretty pleased with how it turned out:

As I've mentioned before, I bought a huge lot of Orks from an ad on Craiglist, and most of them were in various stages of assembly. The warbikers were mostly assembled, but one of them had a broken handlebar, and this poor guy was missing an arm:


I dug through all my bits (which take up several decent-sized boxes at this point), but I had NO spare Ork arms. None. One of the advantages of when GW switched to mostly plastic kits is that they give you lots of extra bits for converting, but they're very good at picking one particular body part per army and not giving you any extras, lest you be able to build a single soldier for free. With Space Marines it was legs, apparently with Orks it's arms. Regardless, I had to come up with something - I dug through my bits again, and the only arm I had that was in a remotely similar pose was this one - I think it's from a Chaos Marine:


Several problems present themselves right off the bat: First, it's a human(oid) arm, so it's too short. It's a left arm, and I need a right. And the glove is all wrong.

I was looking closely at the hand, and the thumb is "centered" enough that I didn't think it would be especially noticeable if I switched sides, so I chopped it in half at the shoulder and flipped it around:


To fix the length issue, I shaved off the elbow armor, cut it in half at the wrist, and extended the arm with some Green Stuff:


The other Warbikers are only wearing one shoulderpad (on the left), but I wasn't confident in my ability to freehand sculpt a large section of shirt, so I decided to give this Warbiker a shouldpad on each side (let's just say he's Seargant Ork, or something). I grabbed a spare Space Marine shoulderpad:


The Marine shoulderpad is way too tall, so I chopped a section out of the middle and glued it back together:


I gave it a bit of filing to smooth out the shape, remove the ridges from the sides, and taper the ridge along the bottom. Then I glued it on the arm:


Next, I rolled out some Green Stuff into a thin sheet, cut out a small rectangle, and laid it on the arm to make the shirt sleeve:


I then attached the arm to the model and glued it down, since the Green Stuff was still just a bit pliable at this point, so I was able to twist & position the arm without breaking it. I then rolled out a veeeery small "sausage" of Green Stuff and placed it at the edge of the sleeve, so I can eventually make the cuff of the shirt "flapping" in the breeze, to match the other side:


After letting everything dry overnight, it was just a matter of lots of careful filing with my jeweler's files to bring the forearm & shirt sleeve into the right shape, remove the unwanted details from the glove, cut the gusset vent into the glove's cuff, file the crook in his elbow, and to define the transition of the glove to the wrist. Overall I was pretty happy with how it came out:


I used a thin coat of watered-down brush-on primer to fill any slight imperfections or filing marks:


Here's a comparison of each side of the model:


I think that once they're primed and painted, it won't be noticeable at all. Just an FYI, I absolutely wouldn't have been able to pull this off without the techniques I learned from Joe Orteza at GenCon - if you get a chance to take one of his classes at a convention, jump on it!

Sunday, August 22, 2010

Update: Casting Bases

So here's the results of of my custom bases project:


All-in-all I got 92 trench bases and 84 "urban wasteland" bases out of 28 ounces of resin - I originally calculated that I could get two-hundred-and-twenty-something. There were ten bases in my mold - the first few times I mixed way too much resin, I had a few castings that got ruined entirely due to a bad ratio / poor mixing, and every other batch or so I would have one bad base per casting. So, that works out about right. I plan on picking up another batch of resin for another project that I have in the works, and I'll probably use whatever is left to cast some more bases - but, I am seeing some degradation of the mold. It's partially because some of the bases I made would really be better suited to a two-piece mold and it's hard on the mold when I remove them, and partially because I wasn't super careful with the process every time - but, it is a consumer product, and the mold isn't meant to turn out industrial-sized quantities and last for years, like commercial-spec molds.

To help me get all these cleaned up & ready for painting, I picked this up today:


I already have a rotary tool, but it's around 12 years old and the batteries barely hold a charge anymore. I've also wanted one with the flexible extension for a while, to make it easier to do close-up work. Now I just have to build the figures that will go ON the bases...

Saturday, August 21, 2010

Terrain: Alien Plants

Hey, remember in my last post where I saved that big blob of insulation foam for a "future project"? Well, this is that project:

One of the reasons I was so keen on saving it was that it was a very "organic-looking" shape - something that's not easy to come by when scratch-building terrain. Sci-fi buildings are dead easy; wander down any aisle in the home improvement store and you'll see a dozen things that you could spray-paint silver and they'd look at home on a gaming table. Mimicking nature, especially nature from a fictional world, is a bit more difficult.

Here's what I was starting with - the cured "bubble" of expanding insulation foam, left over from my last project:


While I was looking at it and trying to decide what to do with it, I decided it would make a good giant alien plant-thing - it reminded me a bit of a giant corpse lily.

To start, I grabbed a scrap piece of foamcore board to base it. I laid the bubble on the foamcore and roughly traced the outline with a marker:


Then I cut out the base and attached the bubble with hot glue. I made sure to cover any square edge thoroughly with hot glue, to keep everything "organic"-looking:


Using an old brush, the entire piece received a generous coat of PVA glue - this will allow me to use traditional spray primer, without having to worry about the foam melting:


After that had dried, I flipped if over and coated the bottom (I don't want the internal core of the foamcore board to melt, either!)


After the glue had dried, I gave it a coat of white primer:


It appears that the foam was actually still curing a bit when I primed it, and the primer and the foam cured at different rates, giving the piece a more shriveled, "brainy" appearance. This was actually kinda cool looking.

After the primer had dried, I was ready to paint. I didn't have a particular paint scheme in mind, so I just grabbed some colors that said "alien plant" to me and went at it.

To start, I made a 50/50 mix of Vallejo Game Color Black & Citadel Goblin Green and started at the base. I laid the paint on pretty thick at the very bottom, then "feathered" it up with a wide brush:


After that, I worked up the piece with Citadel Warlock purple. I wet-blended that into a 50/50 mix of Warlock Purple & P3 Carnal Pink, into straight P3 Carnal Pink, and a final dot of Citadel Skull white at the top:


After it dried I was ready to clearcoat it. While I usually use a matte acrylic varnish, I want this piece to have a wet, "pustulating" feel to it - so I used a high-gloss varnish (Krylon Crystal Clear Acrylic Coating #1303):


Next, I needed some leaves. I wasn't going to bother trying to model leaves, I just used some leaves from an artificial flower arrangement:


(By the way, if my wife asks you, I totally didn't steal these from one of her household decorations, okay? Okay).

These leaves had a pretty severe "curve" to them, so I laid them out and cut them at the point where they laid flat:


Then I just took my hot glue gun and started gluing them to the underside of the base:


I tried to keep the spread of the leaves roughly symmetrical, with the largest leaves opposite each other, then filled in the gaps with the smaller leaves:


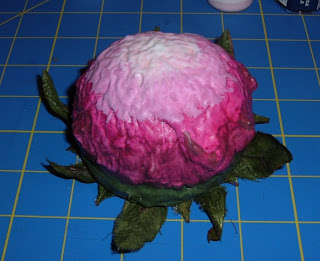
Here's the finished product:


So there you have it - a cool alien plant, made in about a half-hour. Total cost: Free.